If you’ve never used Tiled read this first!
In this tutorial part we are going to look at loading orthogonal maps in LibGDX. Orthogonal basically means “at a right angle to” which is a fancy way of saying the camera is looking straight at the scene. Another much less fancy word for this style of game is “top down”. Common examples include almost every single game from the 16Bit generation of consoles such as Zelda or MegaMan.
One of the first problems you are going to encounter is how do you create your maps? One very common solution is the Tiled Map Editor which fortunately I just completed a tutorial on! This tutorial assumes you know how to generate a TMX file, so if you haven’t be sure to go through the linked tutorial. Fortunately LibGDX makes it very easy to work with TMX files.
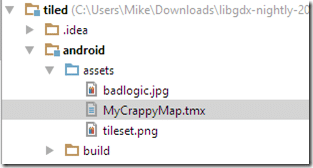
First things first we need to copy the TMX and any/all tilemap image files used to your assets folder, like so:

You may notice unlike earlier tutorials I am currently using IntelliJ. With the recent switch to Gradle it is much easier to get up and running in IntelliJ and I massively prefer it to Eclipse. That said, everything I say is equally valid in Eclipse or IntelliJ and when there are differences, I will point them out. If you want to get started with IntelliJ read here.
Alright, back on topic…
Now that you have the map and tilesets in your project, let’s jump right in with the code:
package com.gamefromscratch;

import com.badlogic.gdx.ApplicationAdapter;
import com.badlogic.gdx.Gdx;
import com.badlogic.gdx.Input;
import com.badlogic.gdx.InputProcessor;
import com.badlogic.gdx.graphics.GL20;
import com.badlogic.gdx.graphics.OrthographicCamera;
import com.badlogic.gdx.graphics.Texture;
import com.badlogic.gdx.maps.tiled.TiledMap;
import com.badlogic.gdx.maps.tiled.TiledMapRenderer;
import com.badlogic.gdx.maps.tiled.TmxMapLoader;
import com.badlogic.gdx.maps.tiled.renderers.OrthogonalTiledMapRenderer;

public class TiledTest extends ApplicationAdapter implements InputProcessor {
    Texture img;
    TiledMap tiledMap;
    OrthographicCamera camera;
    TiledMapRenderer tiledMapRenderer;

    @Override
    public void create () {
        float w = Gdx.graphics.getWidth();
        float h = Gdx.graphics.getHeight();

        camera = new OrthographicCamera();
        camera.setToOrtho(false,w,h);
        camera.update();
        tiledMap = new TmxMapLoader().load("MyCrappyMap.tmx");
        tiledMapRenderer = new OrthogonalTiledMapRenderer(tiledMap);
        Gdx.input.setInputProcessor(this);
    }

    @Override
    public void render () {
        Gdx.gl.glClearColor(1, 0, 0, 1);
        Gdx.gl.glBlendFunc(GL20.GL_SRC_ALPHA, GL20.GL_ONE_MINUS_SRC_ALPHA);
        Gdx.gl.glClear(GL20.GL_COLOR_BUFFER_BIT);
        camera.update();
        tiledMapRenderer.setView(camera);
        tiledMapRenderer.render();
    }

    @Override
    public boolean keyDown(int keycode) {
        return false;
    }

    @Override
    public boolean keyUp(int keycode) {
        if(keycode == Input.Keys.LEFT)
            camera.translate(-32,0);
        if(keycode == Input.Keys.RIGHT)
            camera.translate(32,0);
        if(keycode == Input.Keys.UP)
            camera.translate(0,-32);
        if(keycode == Input.Keys.DOWN)
            camera.translate(0,32);
        if(keycode == Input.Keys.NUM_1)
            tiledMap.getLayers().get(0).setVisible(!tiledMap.getLayers().get(0).isVisible());
        if(keycode == Input.Keys.NUM_2)
            tiledMap.getLayers().get(1).setVisible(!tiledMap.getLayers().get(1).isVisible());
        return false;
    }

    @Override
    public boolean keyTyped(char character) {

        return false;
    }

    @Override
    public boolean touchDown(int screenX, int screenY, int pointer, int button) {
        return false;
    }

    @Override
    public boolean touchUp(int screenX, int screenY, int pointer, int button) {
        return false;
    }

    @Override
    public boolean touchDragged(int screenX, int screenY, int pointer) {
        return false;
    }

    @Override
    public boolean mouseMoved(int screenX, int screenY) {
        return false;
    }

    @Override
    public boolean scrolled(int amount) {
        return false;
    }
}
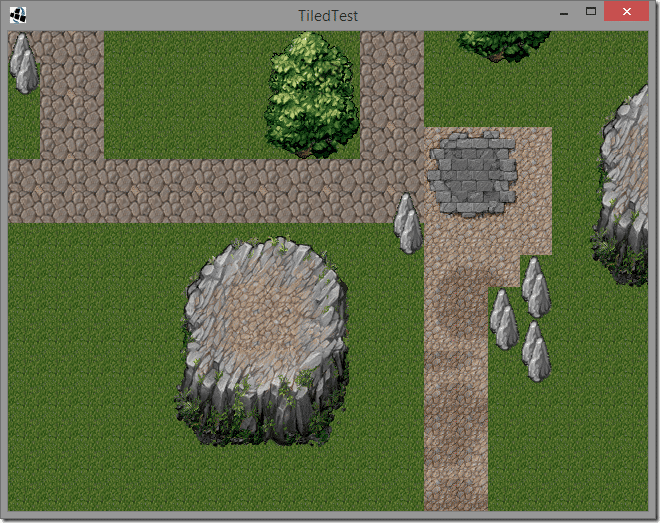
When you run the code you should see your map. Pressing the arrow keys will scroll around the map ( and show bright red when you’ve moved beyond the extents of your map ) . Pressing 0 or 1 will toggle the visibility of each of the two layers in your map. ( See the tutorial on Tiled if that makes no sense ).

The impressive thing here is how little code was required to accomplish so much. In a nutshell it was basically just this:
camera = new OrthographicCamera();
camera.setToOrtho(false,w,h);
camera.update();
tiledMap = new TmxMapLoader().load("MyCrappyMap.tmx");
tiledMapRenderer = new OrthogonalTiledMapRenderer(tiledMap);
We create an OrthographicCamera, set it to the dimensions of the screen and update() it. Next we load our map using TmxMapLoader.load() and create a OrthogonalTiledMapRenderer passing in our tiled map.
In our render method:
camera.update();
tiledMapRenderer.setView(camera);
tiledMapRenderer.render();
Basically update the camera ( in case we moved it using arrow keys ), pass it in to the TiledMapRenderer with setView() and finally render() the map. That’s it.
As you can see in our key handler:
@Override
public boolean keyUp(int keycode) {
    if(keycode == Input.Keys.LEFT)
        camera.translate(-32,0);
    if(keycode == Input.Keys.RIGHT)
        camera.translate(32,0);
    if(keycode == Input.Keys.UP)
        camera.translate(0,-32);
    if(keycode == Input.Keys.DOWN)
        camera.translate(0,32);
    if(keycode == Input.Keys.NUM_1)
        tiledMap.getLayers().get(0).setVisible(!tiledMap.getLayers().get(0).isVisible());
    if(keycode == Input.Keys.NUM_2)
        tiledMap.getLayers().get(1).setVisible(!tiledMap.getLayers().get(1).isVisible());
    return false;
}
Navigating around the map is simply a matter of moving around the camera. We move in 32pixel chunks because those are the size of our tiles. So basically we move the camera left/right/up/down by one tile each time an arrow key is pressed. In the event the 0 or 1 key are pressed we toggle the visibility of that particular layer. As you can see, you can access the TileMap layers using the getLayers().get() function.
In the next part we will look at adding some more complex functionality.
