Love the Unreal Engine but wish you could work with the C# programming language? A little over a year ago we looked at the USharp project which sadly seems to have been abandoned. Thankfully there is another project, UnrealCLR that has come a long way in a very short period of time. In this tutorial, we will look at the basics of getting up and running using UnrealCLR. There are a few things you need to have installed before getting started.
The first most obvious requirement is Unreal Engine, the newest version (4.25.3) as of time of writing. You also need to have your native build chain installed (this is available for Windows, Linux and Mac so this will change from platform to platform), on Windows that means using Visual Studio 2017 or new, the community version is fine. You also need to have DotNet core installed as well as a git client.
We start things off by creating a new project in Unreal Engine. Create a new Game Project:

A Blank template is fine, although it doesn’t really matter all that much.

The defaults are fine, stick to Blueprints for the type.

Let Unreal create the project, then shut it down as it’s UnrealCLR configuration time. Now right click your newly created project, and choose Show in Folder.

This will open the project up in Windows Explorer, select the location, copy and paste and close this window.

Now it’s time to install UnrealCLR, copy the git address from https://github.com/nxrighthere/UnrealCLR (https://github.com/nxrighthere/UnrealCLR.git)
Open a command prompt then clone that repository into a permanent directory ( the install will persist in this folder ). Simply run:
git clone https://github.com/nxrighthere/UnrealCLR.git
Next
cd UnrealCLR(+version)\install
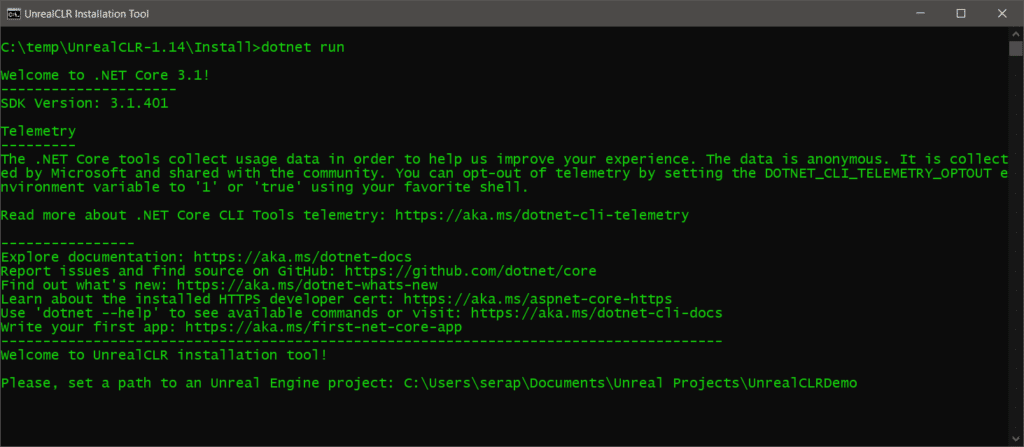
dotnet run
This will run the installer, the first thing you need to do is paste in the path to the Unreal Engine Project we copied earlier.

Answer Y to all of the remaining questions and let the install finish. Now load your Unreal Engine project again, and you will be prompted to build the missing UnrealCLR module, say yes. If this portion fails your build settings aren’t configured properly.

Once your project is loaded, select File->Open Level… then choose Tests in the Tests folder.

You can now hit the Play icon and see a C# powered example in action:

You can see how the Level is launched by using Blueprints->Open Level Blueprint

In the Blueprint editor, hit the Stop icon if running, then you can select the active example in the Test Systems variable:

You can now select a different example on the right hand side of the screen.

So where exactly is the source code controlling this? The tests projects are located in the UnrealCLR folder. In my case that’s C:\temp\UnrealCLR-1.14\Source\Managed\Tests. The following for example is InstancedStaticMeshes.cs, the very first example with the spinning cubes.
using System;
using System.Drawing;
using System.Numerics;
using System.Reflection;
using UnrealEngine.Framework;

namespace UnrealEngine.Tests {
	public static class InstancedStaticMeshes {
		private const int maxCubes = 200;
		private static Actor actor = new Actor("InstancedCubes");
		private static SceneComponent sceneComponent = new SceneComponent(actor);
		private static Transform[] transforms = new Transform[maxCubes];
		private static InstancedStaticMeshComponent instancedStaticMeshComponent = new InstancedStaticMeshComponent(actor, setAsRoot: true);
		private static Material material = Material.Load("/Game/Tests/BasicMaterial");
		private static float rotationSpeed = 2.5f;

		public static void OnBeginPlay() {
			Debug.AddOnScreenMessage(-1, 3.0f, Color.LightGreen, MethodBase.GetCurrentMethod().DeclaringType + " system started!");

			World.GetFirstPlayerController().SetViewTarget(World.GetActor<Camera>("MainCamera"));

			instancedStaticMeshComponent.SetStaticMesh(StaticMesh.Cube);
			instancedStaticMeshComponent.SetMaterial(0, material);
			instancedStaticMeshComponent.CreateAndSetMaterialInstanceDynamic(0).SetVectorParameterValue("Color", LinearColor.White);

			for (int i = 0; i < maxCubes; i++) {
				sceneComponent.SetRelativeLocation(new Vector3(150.0f * i, 50.0f * i, 100.0f * i));
				sceneComponent.SetRelativeRotation(Maths.CreateFromYawPitchRoll(5.0f * i, 0.0f, 0.0f));
				sceneComponent.AddLocalOffset(new Vector3(15.0f * i, 20.0f * i, 25.0f * i));
				sceneComponent.GetTransform(ref transforms[i]);
				instancedStaticMeshComponent.AddInstance(transforms[i]);
			}

			Debug.AddOnScreenMessage(-1, 3.0f, Color.LightGreen, "Instances are created! Number of instances: " + instancedStaticMeshComponent.InstanceCount);
		}

		public static void OnEndPlay() => Debug.ClearOnScreenMessages();

		public static void OnTick() {
			Debug.AddOnScreenMessage(1, 1.0f, Color.SkyBlue, "Frame number: " + Engine.FrameNumber);

			float deltaTime = World.DeltaTime;
			Quaternion deltaRotation = Maths.CreateFromYawPitchRoll(rotationSpeed * deltaTime, rotationSpeed * deltaTime, rotationSpeed * deltaTime);

			for (int i = 0; i < maxCubes; i++) {
				sceneComponent.SetWorldTransform(transforms[i]);
				sceneComponent.AddLocalRotation(deltaRotation);
				sceneComponent.GetTransform(ref transforms[i]);

				instancedStaticMeshComponent.UpdateInstanceTransform(i, transforms[i], markRenderStateDirty: i == maxCubes - 1);
			}
		}
	}
}
As you can see your game logic is implemented using a series of callback functions called by the engine. You can learn more about the programming model in the manual. Learn more about UnrealCLR and getting started in the video below.
