In the previous tutorial we looked at handling touch and gesture events. These days, most mobile devices have very accurate motion detection capabilities, which LibGDX fully supports. In this example we will look at how to handle motion as well as detect if a device supports certain functionality and to detect which way the device is oriented.
This project revolves around a single code example, but there are some configuration steps you need to be aware of.
First off, in order to tell LibGDX that you want to use the compass and accelerometer, you need to pass that as part of the configuration in your Android MainActivity. In the android project locate MainActivity.java and edit it accordingly:
package com.gamefromscratch;
import android.os.Bundle;
import com.badlogic.gdx.backends.android.AndroidApplication;
import com.badlogic.gdx.backends.android.AndroidApplicationConfiguration;

public class MainActivity extends AndroidApplication {
    @Override
    public void onCreate(Bundle savedInstanceState) {
        super.onCreate(savedInstanceState);
        AndroidApplicationConfiguration cfg = new AndroidApplicationConfiguration();
        cfg.useGL20 = true;
        cfg.useAccelerometer = true;
        cfg.useCompass = true;
        initialize(new MotionDemo(), cfg);
    }
}
The meaningful lines are
cfg.useAccelerometer = true;
and
cfg.useCompass = true;
These lines tell LibGDX to enable both.
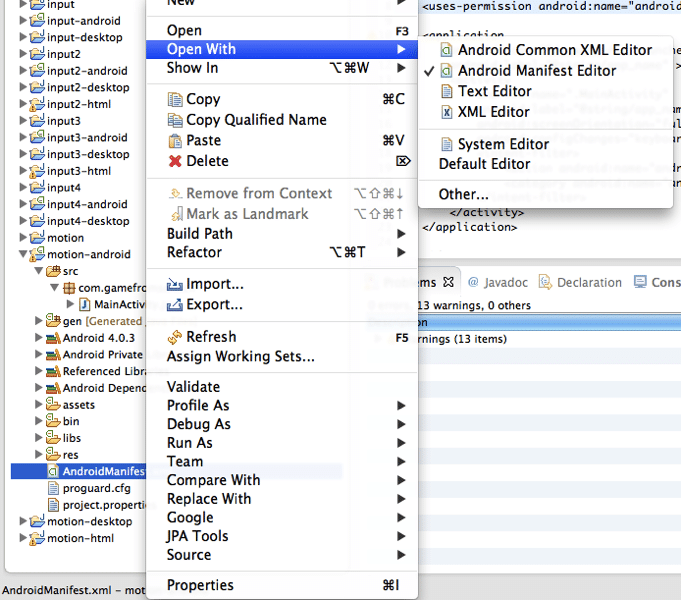
Next we need to make a couple of changes to your Android manifest. This is a configuration file of sorts that tells the Android operating system how your application performs and what permissions it requires to run. You could literally write an entire book about dealing with Android manifests, so if you want more information read here. The manifest is located at the root of your Android project and is called AndroidManifest.xml. There are a couple ways you can edit it. Simply right click AndroidManifest.xml and select Open With->.

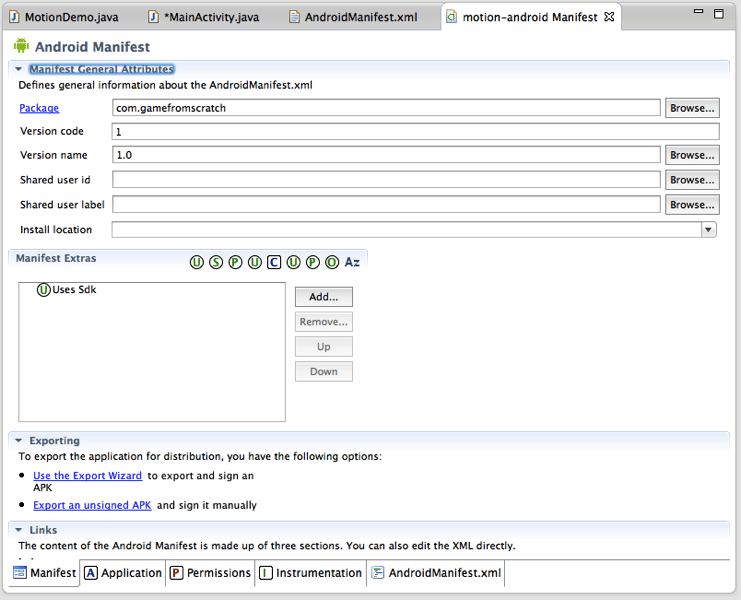
I personally prefer to simply edit using the Text Editor, but if you want a more guided experience, you can select Android Manifest Editor, which brings up this window:

This is basically a GUI layer over top of the Android manifest. Using the tabs across the bottom you can switch between the different categories and a corresponding form will appear. If you click AndroidManifest.xml it will bring up a text view of the manifest. Use whichever interface you prefer, it makes no difference in the end.
There are two changes we want to make to the manifest. First we want the device to support rotation, so if the user rotates their device, the application rotates accordingly. This is done by setting the property android:screenOrientation to fullsensor. Next we want to grant the permission android.permission.VIBRATE. If you do not add this permission calling a vibrate call will cause your application to crash!
Here is how my manifest looks with changes made:
<?xml version="1.0" encoding="utf-8"?>
<manifest xmlns:android="http://schemas.android.com/apk/res/android"
    package="com.gamefromscratch"
    android:versionCode="1"
    android:versionName="1.0" >
    <uses-sdk android:minSdkVersion="5" android:targetSdkVersion="17" />
    <uses-permission android:name="android.permission.VIBRATE"/>
    <application
        android:icon="@drawable/ic_launcher"
        android:label="@string/app_name" >
        <activity
            android:name=".MainActivity"
            android:label="@string/app_name"
            android:screenOrientation="fullSensor"
            android:configChanges="keyboard|keyboardHidden|orientation|screenSize">
            <intent-filter>
                <action android:name="android.intent.action.MAIN" />
                <category android:name="android.intent.category.LAUNCHER" />
            </intent-filter>
        </activity>
    </application>
</manifest>
The changes have been bolded above. You want to be careful when you request additional permissions as they will be shown when the user installs your application. Too many permissions and people start getting scared of your application. Of course, if you need to do something that requires a permission there isn’t much you can do! As to the screenOrientation value, this tells Android which direction to create your application as. There are a number of options, Landscape and Portrait being two of the most common. fullSensor basically means all directions supported. This means you can rotate the device 360 degrees and it will be rotated accordingly. On the other hand, if you select “user”, you cannot rotate the device 180 degrees, meaning you cannot use it upside down. You can read more about the available properties in the link I provided earlier.
There is one last important thing to be aware of before moving on. Your android project will actually have two AndroidManifest.xml files, one in the root directory another in the bin subfolder. Be certain to use the one in the root directory, as the other one will be copied over!
Ok, now that we are fully configured, let’s jump into the code sample:
package com.gamefromscratch;
import com.badlogic.gdx.ApplicationListener;
import com.badlogic.gdx.Gdx;
import com.badlogic.gdx.Input.Orientation;
import com.badlogic.gdx.Input.Peripheral;
import com.badlogic.gdx.graphics.Color;
import com.badlogic.gdx.graphics.GL10;
import com.badlogic.gdx.graphics.g2d.BitmapFont;
import com.badlogic.gdx.graphics.g2d.SpriteBatch;
public class MotionDemo implements ApplicationListener {
private SpriteBatch batch;
private BitmapFont font;
private String message = "Do something already!";
private float highestY = 0.0f;
@Override
public void create() {
   batch = new SpriteBatch();
   font = new BitmapFont(Gdx.files.internal("data/arial-15.fnt"),false);
   font.setColor(Color.RED);
}
@Override
public void dispose() {
   batch.dispose();
   font.dispose();
}
@Override
public void render() {
   int w = Gdx.graphics.getWidth();
   int h = Gdx.graphics.getHeight();
   Gdx.gl.glClearColor(1, 1, 1, 1);
   Gdx.gl.glClear(GL10.GL_COLOR_BUFFER_BIT);
   batch.begin();
   int deviceAngle = Gdx.input.getRotation();
   Orientation orientation = Gdx.input.getNativeOrientation();
   float accelY = Gdx.input.getAccelerometerY();
   if(accelY > highestY)
      highestY = accelY;
   message = "Device rotated to:" + Integer.toString(deviceAngle) + " degrees\n";
   message += "Device orientation is ";
   switch(orientation){
      case Landscape:
         message += " landscape.\n";
         break;
      case Portrait:
         message += " portrait. \n";
         break;
      default:
         message += " complete crap!\n";
         break;
   }
   message += "Device Resolution: " + Integer.toString(w) + "," + Integer.toString(h) + "\n";
   message += "Y axis accel: " + Float.toString(accelY) + " \n";
   message += "Highest Y value: " + Float.toString(highestY) + " \n";
   if(Gdx.input.isPeripheralAvailable(Peripheral.Vibrator)){
      if(accelY > 7){
         Gdx.input.vibrate(100);
      }
   }
   if(Gdx.input.isPeripheralAvailable(Peripheral.Compass)){
      message += "Azmuth:" + Float.toString(Gdx.input.getAzimuth()) + "\n";
      message += "Pitch:" + Float.toString(Gdx.input.getPitch()) + "\n";
      message += "Roll:" + Float.toString(Gdx.input.getRoll()) + "\n";
   }
   else{
      message += "No compass available\n";
   }
   font.drawMultiLine(batch, message, 0, h);
   batch.end();
}
@Override
public void resize(int width, int height) {
   batch.dispose();
   batch = new SpriteBatch();
   String resolution = Integer.toString(width) + "," + Integer.toString(height);
   Gdx.app.log("MJF", "Resolution changed " + resolution);
}
@Override
public void pause() {
}
@Override
public void resume() {
}

}
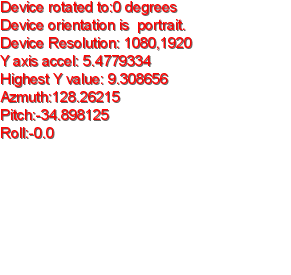
When you run this program on a device, you should see:

As you move the device, the various values will update. If you raise your phone to be within about 30 degrees of completely upright it will vibrate. Of course, this assumes that your device supports all these sensors that is!
The code itself is actually remarkably straight forward, LibGDX makes working with motion sensors remarkably easy, its just actually understanding the returned values that things get a bit more complicated. The vast majority of the logic is in the render() method. First we get the angle the device is rotated in. This value is in degrees with 0 being straight in front of you parallel to your face. One important thing to realize is this value will always have 0 as up, regardless to if you are in portrait or landscape mode. This is something LibGDX does to make things easier for you, but is different behaviour than the Android norm.
Next we get the orientation of the device. Orientation can be either landscape or portrait (wide screen vs tall screen). Next we check the value of the accelerometer along the Y access using getAccelerometerY(). You can also check the accelerometer for movement in the X and Z axis using getAcceleromterX() and getAcceleromterZ() respectively. Once again, LibGDX standardizes the axis directions, regardless to the devices orientation. Speaking of which, Y is up. The means if you hold your phone straight in front of you parallel to your face, the Y axis is what you would traditionally think of as up and down. The Z axis would be in front of you, so if you made a push or pulling motion, this would be along the Z axis. The X axis would track movements to the left and right.
So then, what exactly are the values returned by the accelerometer? Well this part gets a bit confusing, as it measures both speed and position in a way. If you hold your phone straight out in front of you, with the screen parallel to your face, it will return a value of 9.8. That number should look familiar to you, it’s the speed a body falls due to gravity in meters per second. Therefore if your phone is stationary and upright, its 9.8. If you move the phone up parallel to your body, the value will rise above 9.8, the amount depends on how fast your are moving the phone. Moving down on the other hand will return a value below 9.8. If you put the phone down flat on a desk it will instead return 0. Flipping the phone upside down will instead return -9.8 if held stationary. Obviously the same occurs along the X and Z axis, but instead that would indication motion left and right or in and out instead of up and down.
Ok, back to our code. We check to see if the current accelY value is the highest and if it is, we record it to display. Next we check what value the orientation returned and display the appropriate message. We dump some information we’ve gathered out to be displayed on screen. Next we make the very important call Gdx.input.isPeripheralAvailable(). This will return true if the users device supports the requested functionality. First we check to see if the phone supports vibrating and if it does, we check if the phone is over 7. Remember the value 9.8 represents straight up and down, so if its 7 or higher its within about 35 degrees of vertical. If it is, we vibrate by calling vibrate(), the value passed is the number of milliseconds to vibrate for.
Next we check to see if the device has a compass. If it does, you can check the position of the device relative to polar north. Here are the descriptions of each value from Google’s documentation:
Azimuth, rotation around the Z axis (0<=azimuth<360). 0 = North, 90 = East, 180 = South, 270 = West
Pitch, rotation around X axis (-180<=pitch<=180), with positive values when the z-axis moves toward the y-axis.
Roll, rotation around Y axis (-90<=roll<=90), with positive values when the z-axis moves toward the x-axis.
You can read more about it here.
Finally we draw the message we have been composing on screen.
There is only one other very important thing to notice in this example:
public void resize(int width, int height) {
   batch.dispose();
   batch = new SpriteBatch();
   String resolution = Integer.toString(width) + "," + Integer.toString(height);
   Gdx.app.log("MJF", "Resolution changed " + resolution);
}
In the resize() method we dispose of and recreate our SpriteBatch(). This is because when you change the orientation of the devices from landscape to portrait or vice versa you invalidate the sprite batch, it is now the wrong size for your device. Therefore in the resize() call, we recreate the SpriteBatch structure.
