Now that we have Cocos2d-x installed and configured and our project created, we are going to take a look at basic graphics operations. This tutorial assumes you ran through the prior part and created a project already. I am going to assume you have a working AppDelegate, so I will only focus on creating a new scene object. The only changes you should have to make are to change your delegate to #include a different file and change the type of scene you call createScene() on.
Ok, let’s jump right in with with a simple example. First we are going to need an image to draw. Personally I am going to use this somewhat… familiar image:

It’s 400×360, with a transparent background named decepticon.png. Of course you can use whatever image you want. Just be certain to add the image to the resources directory of your project.

Ok, now the code to display it.
GraphicsScene.h
#pragma once

#include "cocos2d.h"

class GraphicsScene : public cocos2d::Layer
{
public:
    static cocos2d::Scene* createScene();
    virtual bool init();
    CREATE_FUNC(GraphicsScene);
};
GraphicsScene.cpp
#include "GraphicsScene.h"

USING_NS_CC;

Scene* GraphicsScene::createScene()
{
    auto scene = Scene::create();
    auto layer = GraphicsScene::create();
   scene->addChild(layer);

    return scene;
}

bool GraphicsScene::init()
{
    if ( !Layer::init() )
    {
        return false;
    }

    auto sprite = Sprite::create("decepticon.png");
    sprite->setPosition(0, 0);

    this->addChild(sprite, 0);

    return true;
}
Now when you run this code:
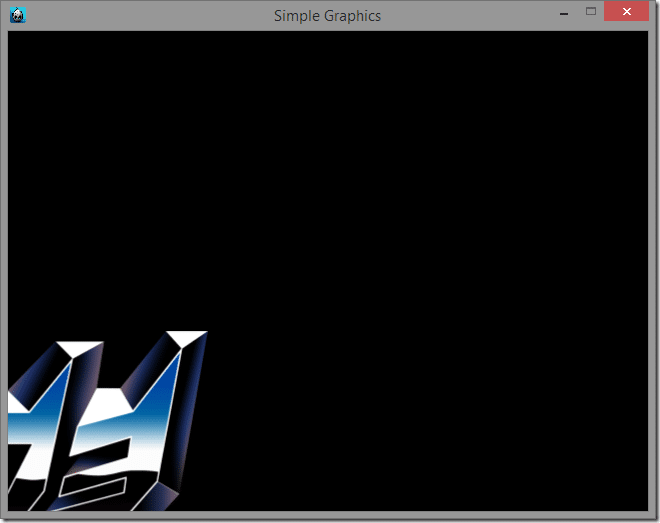
Hmmm, probably not exactly what you expected to happen, but hey, congratulations, you just rendered your first sprite!
So, what exactly is happening here? Well after we created our sprite we called:
sprite->setPosition(0, 0);
This is telling the sprite to position itself at the pixel location (0,0). There are two things we can take away from the results.
1- The position (0,0) is at the bottom left corner of the screen.
2- By default, the position of a sprite is relative to it’s own center point.
Which way is up?
One of the most confusing things when working in 2D graphics is dealing with all the various coordinate systems. There are two major approaches to dealing with locations in 2D, having the location (0,0) at the top left of the screen and having the location (0,0) at the bottom left of the screen. This point is referred to as the Origin. It is common for UI systems, the most famous of which being Windows, to set the origin at the top left of the screen. It is also most common for graphics files to store their image data starting from the top left pixel, but by no means is this universal. On the other hand OpenGL and most mathematicians treat the bottom left corner of the screen as the origin. If you stop and think about it, this approach makes a great deal of sense.
Think back to your high school math lessons ( unless of course you are in high school, in which case pay attention to your math lessons! ) and you will no doubt have encountered this graphic.
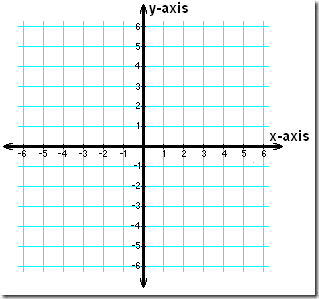
This is a graphic of the Cartesian plane and it is pretty much the foundation of algebra. As you can clearly see, the positive quadrant ( the quarter of that graph with both positive x and y values ) is in the top right corner. Quite clearly then, to a mathematician the value (0,0) is at the bottom left corner of the top right quadrant.
There are merits to both approaches of course, otherwise there would be only one way of doing things!
This will of course lead to some annoying situations, where one API for example delivers touch coordinates in UI space, relative to the top left corner, or when you load a texture that is inverted to what you actually wanted.
Fortunately, Cocos2d-x provides functionality to make these annoyances a little bit less annoying. Just be aware going forward, that coordinate systems can and do change! Also be aware, unlike some frameworks, Cocos2d-x does *NOT* allow you to change the coordinate system. The origin in Cocos2d-x is always at the bottom left corner.
Sometimes positioning relative to the middle can be ideal, especially when dealing with rotations. However, sometimes you want to position relative to another point, generally using the top left or bottom left corner. This is especially true if for example you want to, say… align the feet of a sprite to the top of a platform. Changing the way a sprite ( or any Node ) is positioned is extremely simple in Cocos2d-x. This is done using something called an Anchor Point. Simply change the code like so:
auto sprite = Sprite::create("decepticon.png");
sprite->setAnchorPoint(Vec2(0, 0));
sprite->setPosition(0, 0);
And presto!
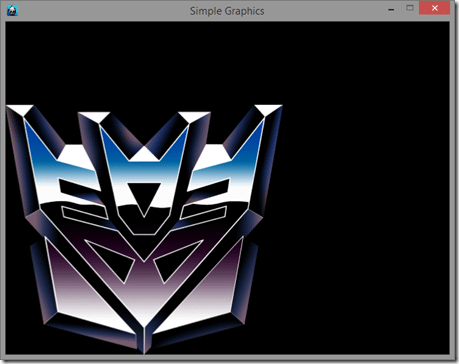
Now our sprite is positioned relative to it’s bottom left corner. However, setAnchorPoint() might not take the parameters you expect it to. Yes, you are passing it in x and y coordinates that represent the location on the sprite to perform transforms relative to. However, we are dealing with yet another coordinate system here, sometimes referred to as Normalized Device Coordinates (NDC). These values are represented by two numbers, one for x and one for y, from 0 to 1, and they are a position within the sprite.
Sprite?
If you are new to game programming, the expression “sprite” might be new to you. The expression was termed way back in 1981 by a Texas Instruments engineer describing the functionality of the TMS9918 chip. Essentially a sprite was a bitmap image with hardware support to be movable. Early game hardware could handle a few sprites, often used to represent the player and enemies in the world. In real world examples, in Super Mario Brothers, Mario, the mushrooms, coins and such would be sprites.
These days, “Sprite” is basically a bitmap image ( or portion of a bitmap, we’ll see this later ) along with positional information. These days the concept of hardware sprites doesn’t really exist anymore.
I am making this sound entirely more complicated than it actually is. Just be aware the value (0,0) is the bottom left corner of the sprite, (1,1) is the top right of the sprite and (0.5,0.5) would be the mid point of the sprite. These coordinate system is extremely common in computer graphics and is used heavily in shaders. You may have heard of UV coordinates, for positioning textures on 3D objects. UV coordinates are expressed this way.
Therefore, if you want to position the sprite using it’s mid point, you would instead do:
sprite->setAnchorPoint(Vec2(0.5, 0.5));
Another important concept to be aware of is a sprite’s positioning is relative to it’s parent. Up until now our sprite’s parent was our layer, let’s look at an example with a different Node as a parent. This time, we are going to introduce another sprite, this one using this image:

It’s a 200×180 transparent image named autobot.png. Once again, add it to the resources folder of your project. Now let’s change our code slightly:
bool GraphicsScene::init()
{
    if ( !Layer::init() )
    {
        return false;
    }

    auto sprite = Sprite::create("decepticon.png");
    auto sprite2 = Sprite::create("autobot.png");
    sprite->setAnchorPoint(Vec2(0.0,0.0));
    sprite2->setAnchorPoint(Vec2(0.0, 0.0));

    sprite->addChild(sprite2);

    sprite->setPosition(100, 100);
    sprite2->setPosition(0, 0);

    this->addChild(sprite, 0);

    return true;
}
And when we run this code:
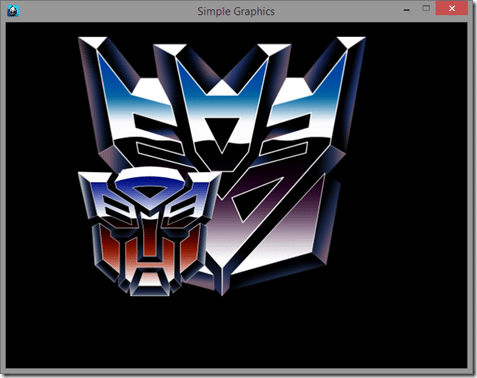
There’s a couple very important things being shown here. Until this point, we’ve simply added our Sprite to our Layer, but you can actually parent any Node to any other Node object. As you can see, both Sprite and Layer inherit from Node, and Node’s form the backbone of a very important concept called a scene graph.
One very important part of this relationship is the child’s position is relative to it’s parent. Therefore sprite2’s (0,0) position is relative to the origin of sprite1 ( not the anchor, origin and anchor are not the same thing and only anchors can be changed ), so moving sprite2 also moves sprite1. This is a great way to create hierarchies of nodes, for example you could make a tank out of a sprite for it’s base and another representing it’s turret. You could then move the base of the tank and the turret would move with it, but the turret itself could rotate independently.Scenegraph
A scenegraph is a pretty simple concept. It’s basically the data structure used to hold the contents of your game. In Cocos2d-x, the scene graph is simply a tree of Node dervived objects. There exists Scene node that is pretty much an empty node with the intention of adding other nodes to it. You then add various nodes to it, nodes to those nodes, etc. An overview of how you can use this system in Cocos2d-x is available here.
So what do you do when you want to get a node’s position in the world, not relative to it’s parent? Fortunately Node has that functionality built in:
Vec2 worldPosition = sprite2->convertToWorldSpace(sprite2->getPosition());
worldPosition’s value would be (100,100). There is also an equivalent function for getting a world space coordinate in node space.
So, in summary:
- The world is composed of Node objects, including Scene, Sprite and Layer
- The screen origin is at the bottom left corner of the screen, always
- Nodes are positioned, scaled and rotated relative to their anchor point
- The default anchor point of a sprite is (0.5,0.5), which is it’s mid point
- Anchor points are defined with a value from (0,0) to (1,1), with (0,0) being bottom left corner and (1,1) being the top right
- Nodes can have other nodes as children. When the parent moves, the child moves with it
- Child node’s origin is the bottom left corner of their parent
- Anchor point and origin are not the same thing
- Sprites can only have other sprites as children ( EDIT – No longer true! There can however be some performance ramifications. Will discuss later )
So that covers the basics of dealing with graphics. Now that we know how to position and parent nodes, next time we will look at something a bit more advanced.
